Think you're human
Viagra? Or maybe you just want to
express your devotion to the magic blue pill. Dress up as your
favorite pharmaceutical this Halloween. We'll show you how to make a
costume that will really raise the dead and, needless to say, keep
you up all night long. |
|
|
Materials
|
Cut the Shape From the Foam Panels To prepare the panels, we stripped the plastic film off of the foam
insulation sheets to create a better surface for the adhesive. Using the L-square to lay out guide lines, we drew up a template of the
tablet on the brown paper, in the distinctive rounded diamond shape. The
ratio of the height of the tablet to the width is about 1:1.5. Ours measured
about 23”x33”. Then we traced the template onto the foam panels. Using the serrated knife, we cut the outline of each tablet shape. | ||
|
|
|
Glue and Polish Then we spread a thin layer of Gorilla Glue on each sheet and stacked
them up, being careful to line up the edges as evenly as possible. When the panels were all glued together, we weighed them down and waited
for the glue to dry overnight. After the glue had dried, we used the serrated knife to plane down the
rough edges on the sides of the tablet to make an even surface. Then we carved the edges of the tablet to round them off. | ||
|
|
|
Oops...We Lost Our Head At this point we realized that we left a step out…Before gluing the panels together, we had meant to cut out the areas that would accommodate the wearer’s head and shoulders. But in our excitement to rush ahead with the project, we forgot. So we hacked the space out using our trusty serrated knife. For comfort and stability, a bicycle helmet will go inside the headpiece. We took a banged up helmet and stripped off the outer covering. To get the helmet to fit inside, we sawed off the back portion with a jigsaw. We put the helmet inside the form and tried it on to get a rough idea of where the eye holes and breathing holes should go, and marked them on the inside. Then we carved out a bit more area on the inside to accommodate the wearer’s face, and cut eye, nose and mouth holes through the front of the foam. The nose and mouth holes are just for breathing and will be covered with fabric, so they don’t have to be big enough for the nose and mouth to fit through.
| ||
|
|
|
Place the Fabric Using brown paper, we layed out a pattern for the fabric covering. First we cut long strips to cover the flat portion of the sides. Then we cut pieces to cover each of the faces. We just used our original pill template and cut it about 3 inches larger all around. We glued the fabric onto the form with Gorilla Glue, starting with the sides. We glued the flat part and curved portion of only one pill face at a time, so gravity would keep the fabric in place. When the first side was dry, we flipped it over and repeated the process. We left the seams for later.
| ||
|
|
|
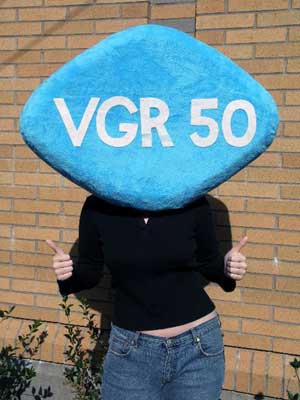
After the glue on the main fabric panels had dried, we finished the seams using the hot glue gun. The hot glue was so hot it was melting the foam, so we just glued the fabric edges together. We pressed them into place with the edge of a putty knife to avoid burnt fingers and a sticky mess. After tracing paper templates for the lettering VGR 50, we cut out the felt forms and lined them up on the front face of the pill. These were glued into place with the hot glue gun, except for the bottom part of the R. We had planned out the lettering so the two legs of the R would go over the eye holes, which would be covered with a see-through white material, making two “windows”. We carefully cut out rectangles in the blue fabric over the eyeholes so they would align with the letter. Then we cut out sections of dryer sheet that would cover the eyeholes and be inlayed for that portion of the R. We glued them in place over the holes, then cut out those sections of the R and glued the remaining felt pieces into place. After dusting out the styrofoam bits and wedging the helmet securely into the form, it was ready to wear.
| ||
|
|
|
|
Viagra is a registered trademark of Pfizer Inc.